I wrote recently about how virtual prototypes (in the form of VDKs) can help embedded software teams practice continuous integration. Synopsys has just released a white paper detailing a practical approach to building a VDK, using the Juno ARM development platform (ADP) to illustrate. Just as a reminder, the point of a virtual prototype is to provide software developers a platform on which they can start development while the hardware is still in design. This is a software model capturing just enough architectural detail to track hardware behavior with reasonable accuracy, but avoiding implementation detail so it can run at close to real-time speed.

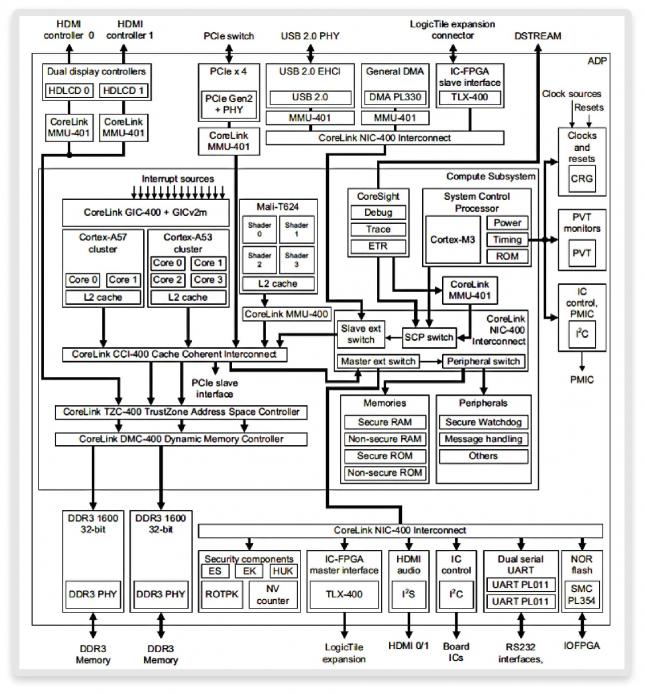
You can see the block diagram for the Juno ADP above. It has lots of functionality – two Cortex clusters, a Mali GPU, a control processor, debug, cache-coherent interconnect and TrustZone security, and a bunch of peripherals. If you take a serial view of “first build the VDK, then use that as a platform for software development” this task could look daunting. Worse yet, you might find that your polished VDK becomes available for use only as first silicon samples appear!

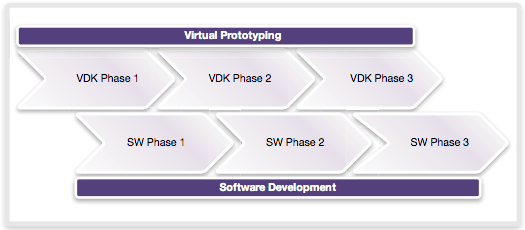
But it doesn’t have to happen that way – VDK development can be pipelined just like any other phase in product design. A software stack in development doesn’t need all features of the virtual prototype to be available from day 1. Components of the software are themselves developed in a pipelined fashion – development for the bootloader, OS, drivers, middleware and applications launch progressively and will require access to control, communications, audio and other layers only as those components evolve. As a result, the virtual prototype can start as a relatively incomplete model with many stubs and can be refined as the software stack itself evolves.
The minimum component you need to start is the compute subsystem, and this is also the easiest part. You just pick up the ARMv8 starting point VDK, do a very small amount of configuration and that part is done. You will want to add stubs for peripherals and other components in the Juno design since you’ll need to reference these in the next steps. This is pretty simple in Virtualizer Studio (VS). Where you already have models available you can of course use them but otherwise you can simply add stubs and add and type interfaces as needed (memory-mapped, interrupt, clock, etc).

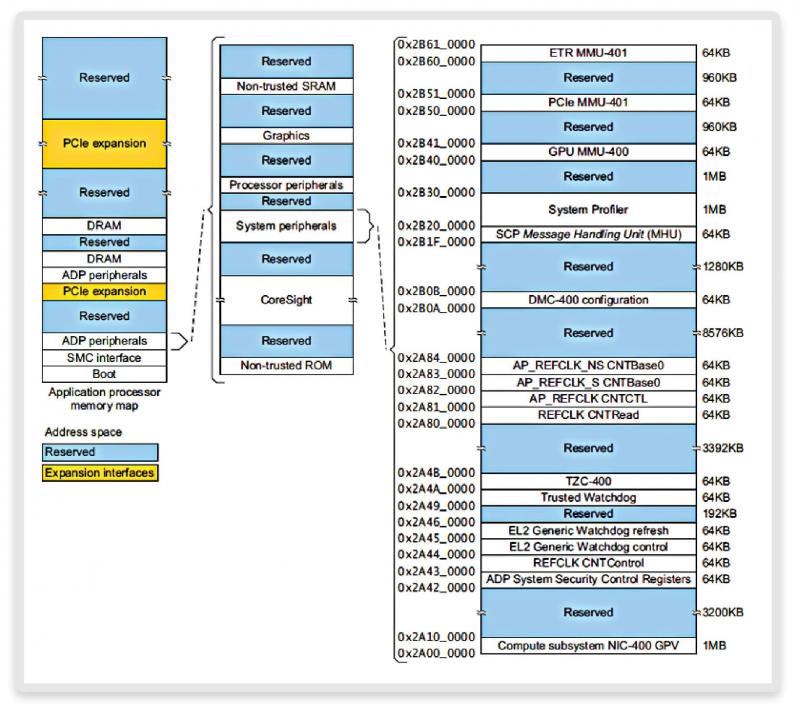
Next you’ll want to add memory-map information, effectively a simple table of masters, slaves and address ranges, since this is fundamental to modeling the hardware-software interface. VS doesn’t require blocks to be connected explicitly in the model to support the memory map. It will generate a basic routing mechanism for you in support of however you define the map.

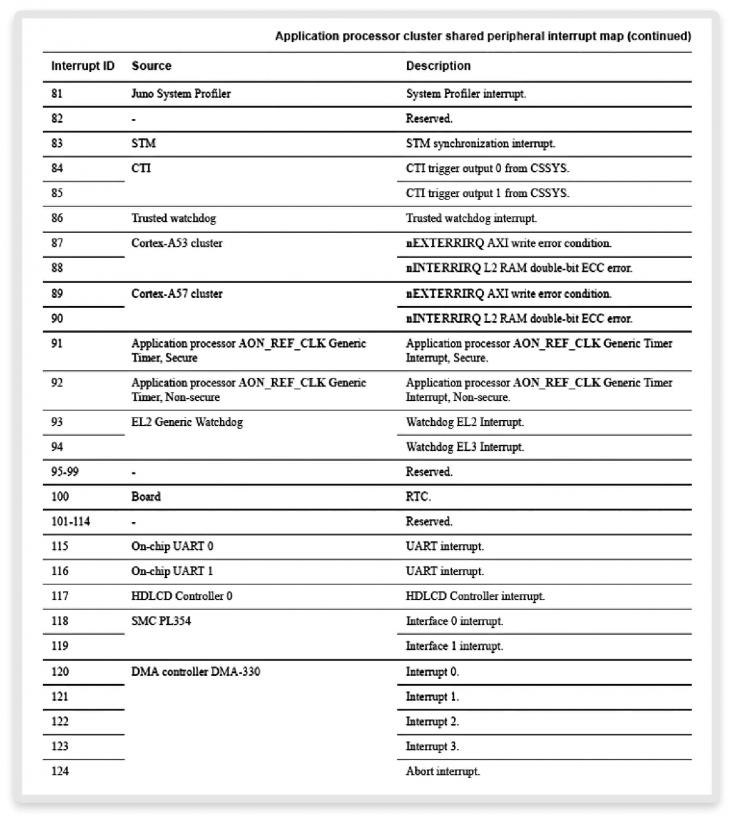
You’ll also need an interrupt map specification, again a simple table of devices and interrupt slots. Note also that in stub models, VS supports simple scripting so you can implement simple behavior for those endpoints without having to manually create a TLM. You can also add clock and reset tree information and model off-chip interfaces in a simple way, to model for example serial I/O. These features together should get you to your first-order VDK on which software development can start. Certainly, with the CPU models in place you should have enough to start testing basic boot.
As development progresses, you’re going to want to replace more of your stub models with real models. VS supports an extensive library covering most standard peripherals among other function types. You might choose to include these in your first revision of the VDK or you might want to introduce them in subsequent revisions. In many cases this is very simple – select the full model you want to use and the stub it will replace. VS will figure out and reconnect memory and interrupt maps and other connections as needed. If the full model supports more than one memory map (or other connections) you’ll need to specify which one should connect to the prototype and provide a way to stub other connections, but again this is a pretty simple substitution.
Even for those functions for which the VS library cannot supply a ready-made VDK you can still defer a lot of the heavy lifting in building a full TLM model. TLM Creator (inside VS) will let you import an interface definition and register map from Excel or IP-XACT, or you can create these through simple table interfaces in the tool. This will build a skeleton model you can use in place of a stub. And when you want to complete the model, you’ll often find the skeleton already has 50% or more of the code on which you need to build.
The white paper provides much more detail on using VS in support of this kind of flow.
Share this post via:


Comments
There are no comments yet.
You must register or log in to view/post comments.