

This article tries to bring out the advantages of having a functional check list. The objective is to make verification as robust as possible. Functional check list ensures the complete coverage of hardware block that is designed. This may to an extent help software developers. Creation of test plan with functional check list as the base will result in creating a test plan which covers end to end of hardware block. Functional check list might already be existing in some of verification process as on today but some sections audience might have missed out.
First lets describe the role of having a check list of functionality that hardware block is designed to perform. The intention of this step is to make sure that none of the functionality of hardware block is missed and the coverage of various scenarios. Secondly, of late I have seen some influence of software requirements having some impact on verification. Let us take an example of uart, if the hardware engineer is having an input that software engineer will use ‘x’ baud rate, then there is possibility that that hardware engineer will make sure that ‘x’ baud rate works perfectly fine and few baud rates around that baud rate. For other baud rates, he may or may not do the verification which could be because of two reasons
[LIST=1]
If the reason was former then it is understandable though it is not convincing. If the reason is later then it is advisable to change the perception.
Functional check list helps in identifying the test case/scenario’s that was missed during verification. In the above case of UART , if the verification engineer misses some of the baud rates then comparing the result of verification to functional check list will bring out the missed scenarios.
It also helps in identifying the corner cases, random and regression testing before proceeding with the verification/test plan.
Typically Asic Design has the following steps
[LIST=1]
Functional check list falls between step3 and step4, i.e. when design specification is ready , functional check list is created.
[LIST=1]
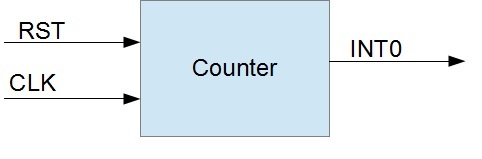
Let us see some simple implementation by having counter as an example. Assume that this counter can perform incrementing count and decrementing count, Interrupt signal when count matches compare value, different clocks and Auto Reload.

Functional check list
[LIST=1]
Above list describes the functionality of the counter. we can find that some of them in the above list is repetitive for e.x : different clock test when counting up and counting down. This is to ensure that hardware block is tested in all scenarios as much as possible.
There can be two more list called as negative list where negative scenario’s can be mentioned and regression list. Negative and regression list is not mentioned here as there is not much for the counter module.
Before starting the verification we can have
[LIST=1]
As the complexity of hardware increases so is the checklist. When there are signals interfaced to the hardware block, it can be written along with one of the functional list. As explained in counter there is interrupt signal when counter matches compare value. Therefore this can be further written as two columns.
[TABLE] border=”1″
|-
| style=”width: 319px” | Functional list
| style=”width: 319px” | Signal name
|-
| style=”width: 319px” | Different Compare value and interrupt generation
| style=”width: 319px” | INT0 (Interrupt signal name)
|-
Table 1
This list helps the verification engineer in writing the test plan and test bench. This gives overview of verification engineer’s understanding of the hardware block. When the hardware complexity increases , time spent on this activity would be more but significantly reduces the effort in feature extraction. With this kind of approach Integration of blocks becomes much easier.
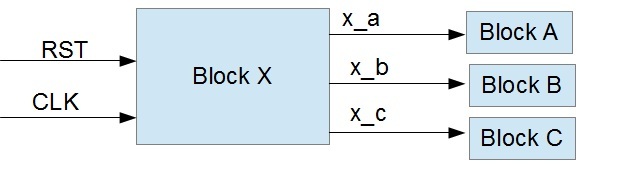
Let us take another example which does the generation of signals. In this example Consider Block X having 3 registers as reg_a, reg_b, reg_c. The functionality of this block is to generate signals based on programming the registers. This block may not have much functionality like the counter but signal generation is the main task of this block. In such cases we can the functionality list as mentioned below
[TABLE] border=”1″
|-
| style=”width: 296px” | Functional list
| style=”width: 295px” | Signal to be asserted
|-
| style=”width: 296px” | Reg_a =1
Reg_a =0
| style=”width: 295px” | X_a =1
X_a =0
|-
| style=”width: 296px” | Reg_b =1
Reg_b =0
| style=”width: 295px” | X_b =1
X_b =0
|-
| style=”width: 296px” | Reg_c =1
Reg_c =0
| style=”width: 295px” | X_c =1
X_c =0
|-
| style=”width: 296px” |
| style=”width: 295px” |
|-
| style=”width: 296px” | Different clocks x,y,z
Reg_a =1
Reg_b =1
Reg_c =1
| style=”width: 295px” | X_a =1
X_b =1
X_c =1
|-
| style=”width: 296px” |
| style=”width: 295px” | X_a =0
X_b =0
X_c =0
|-
Table 2
Looking at the above table, second column gives the opinion of expected result. The answer is yes . For models such as the one mentioned above signal generation is the main functionality.
These are basic examples that are discussed. There are many hardware blocks with complex systems and complex interfaces. The above table becomes complex with the complexity of the module/chip.
The next question that would arise is why not expected result as one of the columns in counter block?
Expected results can be included in test plan where as the functional check list concentrates on functionality coverage
To put it in simple words, with the functional check list chances of missing the corner cases is less
Is functional list different from Feature Extraction?
Objective of the functional list and Feature Extraction is same. In this case, feature extraction can be considered as subset of functional list.
Functional check list will help in systematic approach to verification. It will help in identifying the test bench requirements and approach to functional verification. It is up to verification Engineer to decide the usefulness of this approach.
This is a suggestion. Comments and feedback are welcome. I can be reached at LINKEDIN :
in.linkedin.com/pub/guruprasad-pv/9/947/9b1
guruvadhiraj@gmail.com/gurushesha@gmail.com


Consolidation and Competition: Who is Winning the $4.5 Billion Interface IP Race?